
[ad_1]
When working with applications in ASP.NET Core 6 you will often want to validate your models to ensure that the data they contain conform to the pre-defined validation rules. Enter model validation.
We’ve discussed how we can get started with minimal APIs in an earlier article. This article discusses how to use model validation in minimal APIs.
To work with the code examples provided in this article, you should have Visual Studio 2022 installed in your system. If you don’t already have a copy, you can download Visual Studio 2022 here.
Create an ASP.NET Core minimal Web API project in Visual Studio 2022
First off, let’s create an ASP.NET Core project in Visual Studio 2022. Following these steps will create a new ASP.NET Core Web API 6 project in Visual Studio 2022:
- Launch the Visual Studio 2022 IDE.
- Click on “Create new project.”
- In the “Create new project” window, select “ASP.NET Core Web API” from the list of templates displayed.
- Click Next.
- In the “Configure your new project” window, specify the name and location for the new project.
- Optionally check the “Place solution and project in the same directory” check box, depending on your preferences.
- Click Next.
- In the “Additional Information” window shown next, uncheck the checkbox that says “Use controllers…” since we’ll be using minimal APIs in this example. Leave the “Authentication Type” as “None” (default).
- Ensure that the check boxes “Enable Docker,” “Configure for HTTPS,” and “Enable Open API Support” are unchecked as we won’t be using any of those features here.
- Click Create.
This will create a new ASP.NET Core 6 Web API project in Visual Studio 2022. We’ll use this project to work with model validation in the subsequent sections of this article.
What is model validation? Why is it needed?
Model validation is a technique used to validate model state, i.e., to determine if the data in the model conforms to the defined rules. Let us understand this with an example. Assume you have a model class named Product, in which one of the fields is the Product Code.
Now suppose you have defined an attribute in the Product class whereby the Product Code property cannot have a value that is longer than five characters. If you create an instance of this model class and assign more than five characters to the Product Code property, then model validation for this object will fail.
There is no built-in support for model validation in minimal APIs (unlike in ASP.NET Core MVC and Razor Pages). Hence, you will need to write your own custom code to validate the models in your minimal API applications.
Install the FluentValidation.AspNetCore NuGet package
In this article, we’ll use the FluentValidation validation library, which is available as a NuGet package. FluentValidation uses a fluent API and lambda expressions to create data validation rules.
Now add the FluentValidation.AspNetCore NuGet package to your project. To do this, select the project in the Solution Explorer window, then right-click and select “Manage NuGet Packages.” In the NuGet Package Manager window, search for the FluentValidation.AspNetCore package and install it.
Alternatively, you can install the package via the NuGet Package Manager console by entering the command shown below.
PM> Install-Package FluentValidation.AspNetCore
Create the model class
Create a new class named Product in a file with the same name and a .cs extension, and enter the following code in there.
public class Product
{
    public int Id { get; set; }
    public string Code { get; set; }
    public int Quantity { get; set; }
    public double Price { get; set; }
}
This will serve as the model class we will use for validation.
Create the ProductValidator class
Now suppose the Product class requires a validator, i.e., a class that will validate the properties of the Product class. You can create a custom validator by extending the abstract class named AbstractValidator as shown in the code snippet given below.
public class ProductValidator : AbstractValidator<Product>
{
    public ProductValidator()
    {
        RuleFor(x => x.Id).NotNull();
        RuleFor(x => x.Code).Length(5);
        RuleFor(x => x.Quantity).NotNull();
        RuleFor(x => x.Price).InclusiveBetween(50.00, 250.00);
    }
}
Create the IProductRepository interface
A repository is used in an application to persist data to a data store such as a database or a file system. In this example, we will create a simple repository that has a method named AddProduct, but since we’re focusing on model validation here, we will not include the logic to add a product record to the database.
Create an interface named IProductRepository and enter the following code.
public interface IProductRepository
{
    public void AddProduct(Product product);
}
Create the ProductRepository class
The ProductRepository class implements the IProductRepository interface as shown below.
public class ProductRepository : IProductRepository
{
    public void AddProduct(Product product)
    {
        //Write your code here to add a product record to the database
    }
}
Register the validator and repository classes in Program.cs
Register the ProductValidator and ProductRepository types in the Program.cs file using the following code.
builder.Services.AddScoped<IValidator<Product>, ProductValidator>();
builder.Services.AddScoped<IProductRepository, ProductRepository>();
Create a HttpPost endpoint in Program.cs
Now write the following code in the Program.cs file to create a HttpPost endpoint.
app.MapPost("/product", async (IValidator<Product> validator, IProductRepository repository, Product product) =>
{
    var validationResult = await validator.ValidateAsync(product);
    if (!validationResult.IsValid)
    {
        return Results.ValidationProblem(validationResult.ToDictionary());
    }
    repository.AddProduct(product);
    return Results.Created($"/{product.Id}", product);
});
Note how the parameters validator, repository, and product have been passed. The ValidateAsync method is called to validate the product instance.
Complete model validation example
The complete source code of the Program.cs file is given below for your reference.
using FluentValidation;
var builder = WebApplication.CreateBuilder(args);
// Add services to the container.
builder.Services.AddScoped<IValidator<Product>, ProductValidator>();
builder.Services.AddScoped<IProductRepository, ProductRepository>();
var app = builder.Build();
// Configure the HTTP request pipeline.
app.MapPost("/product", async (IValidator<Product> validator, IProductRepository repository, Product product) =>
{
    var validationResult = await validator.ValidateAsync(product);
    if (!validationResult.IsValid)
    {
        return Results.ValidationProblem(validationResult.ToDictionary());
    }
    repository.AddProduct(product);
    return Results.Created($"/{product.Id}", product);
});
app.Run();
Execute the application
Lastly, let’s execute the application and invoke the HttpPost endpoint from Postman to see model validation in action. Figure 1 shows the output upon validation of the model. Note the error messages in the response.
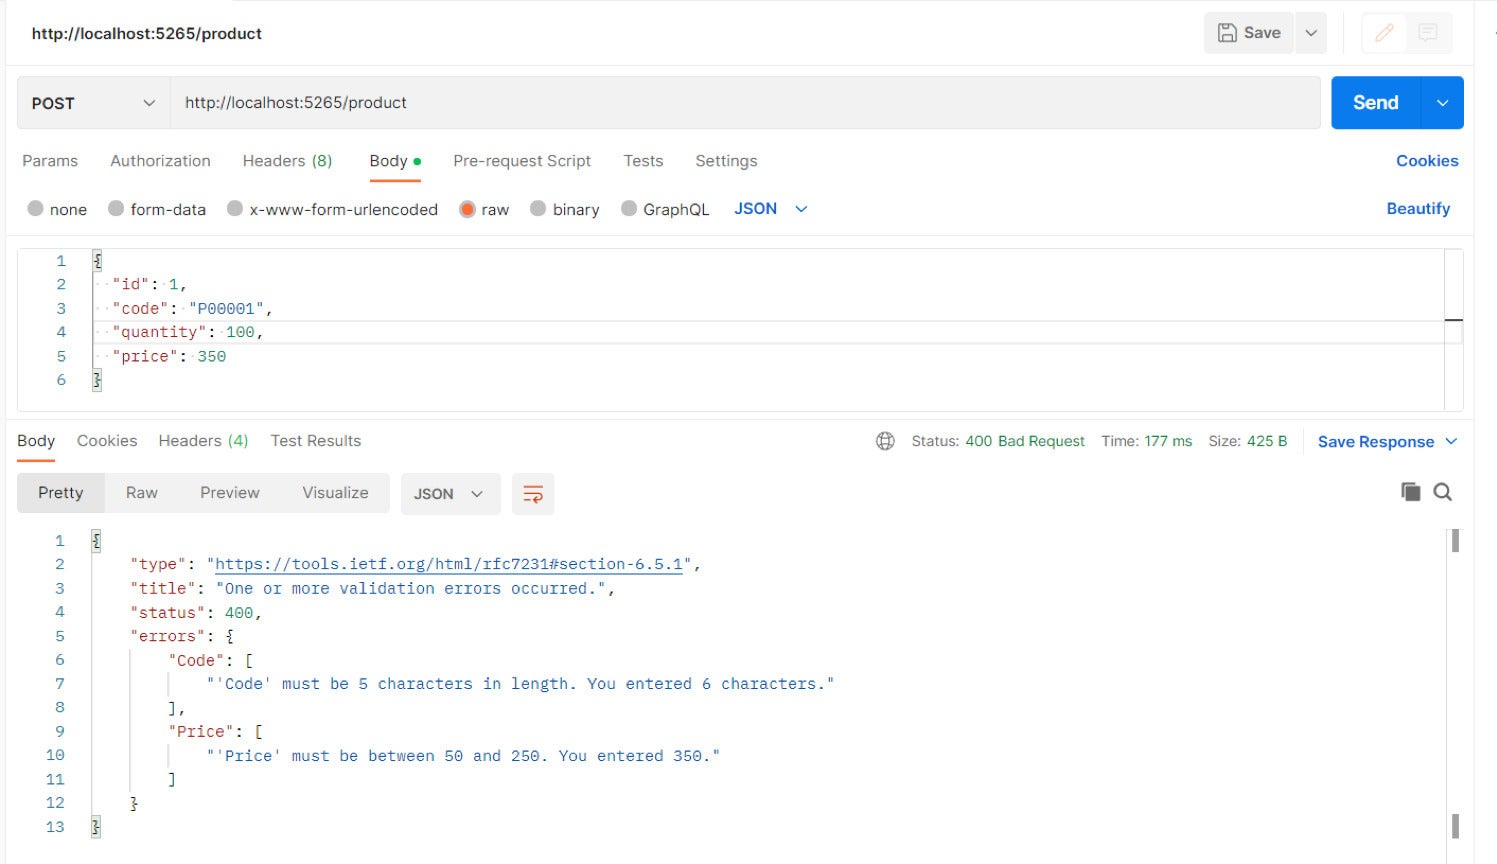 IDG
IDGFigure 1: Model validation in a minimal API in ASP.NET Core 6 using the FluentValidation library.
You can also apply custom validators using the IValidatableObject interface. This interface contains a method named Validate, which you would need to implement yourself. To do so, you would create a model class that implements this interface and the Validate method. I’ll discuss the use of IValidatableObject in a future post here.
Copyright © 2022 IDG Communications, Inc.
[ad_2]
Source link
