
[ad_1]
MongoDB 6 introduced the capability to query encrypted data in the database. Data is encrypted for the entire round trip: at insert, storage, and query. This amounts to a new level of security for data, which remains secure even as it is used within the database. Only the client application is capable of decrypting the data. The database does not hold the keys to the encrypted data at all, yet it still supports querying that data.
Thus MongoDB queryable encryption removes the data store and its infrastructure as targets of attack. This quasi-magical capability does require some extra configuration for applications. This article will show you how to set up a development environment for working with MongoDB queryable encryption in a Node.js application.
Master and data encryption keys
There are two kinds of keys used in MongoDB’s queryable encryption: the customer master key (CMK) and the data encryption keys (DEKs). These work together to secure your data. The DEK is used to encrypt the data in the database, while the CMK is used to encrypt and decrypt the DEK, adding a layer of protection. The CMK is the more sensitive key. If the CMK is compromised, then your data is vulnerable to compromise. If either the CMK or the DEK is lost or inaccessible, then the client application will be unable to decrypt the data.
When developing an application that will use queryable encryption, you can use a local file that holds your CMK on the same server as the application, instead of a remote key store. It’s important to note up front that in production, you must use a remote key store or you will undermine the security of the system.
Generate a CMK
The first step is to generate your CMK. You can do this with the openssl command line tool, as shown in Listing 1.
Listing 1. Generate a local key
openssl rand 96 > cmk.txt
Create a DEK
We’ll create a simple Node.js program to handle our CMK, create a DEK, and insert the DEK into a special encrypted collection in MongoDB called the key vault. Queryable encryption holds the CMK-encrypted DEK in this collection. When making calls against the encrypted application data, your client application retrieves the DEK from the key vault, decrypts the DEK with the CMK, and then uses the decrypted DEK to interact with the database instance.
That’s a lot of encryption going on, but again, the idea is to keep the DEK secure by virtue of the CMK.
The MongoDB docs provide a more fully realized version of the app used to create the DEK key vault table here. We’ll build the bare minimum to try to keep sight of the forest through the trees.
Create a new NPM app by typing npm init. You can accept all defaults. Now make two new js files called make-dek.js and insert.js, and add the lines in the package.json file like Listing 2.
Listing 2. makeDEK script
"scripts": {
    "test": "echo \"Error: no test specified\" && exit 1",
    "makeDEK": "node ./make-dek.js",
    "insert": "node ./insert.js"
}
Now you can run makeDEK.js by entering npm run makeDEK and npm run insert on the command line. (But these commands won’t do anything yet.)
Add dependencies
For the next steps we’ll need two packages installed. Enter the commands in Listing 3 to install them.
Listing 3. Add MondoDB dependencies
npm install mongodb
npm install mongodb-client-encryption
Set up MongoDB Atlas
We’ll use Atlas, MongoDB’s managed service, for this tutorial. As of this writing, to create a MongoDB 6 cluster in Atlas, you’ll need a paid-tier dedicated cluster. (Note that it is possible to use queryable encryption in manual mode with the MongoDB Community Server.)
You can create a free Atlas account here. From there it is easy to set up the cluster (leaving the name as Cluster0) and create a user with password authentication. Just make sure you select “Dedicated Cluster” when you get that choice.
Note that the user must have the AtlasAdmin role to perform these steps. You can set the role on the user by going to “Database Access” in the MongoDB console and clicking “Edit” next to your user. Then in the “Built-in Role” drop-down menu, select AtlasAdmin.
We’ll use the username and password in the next steps to access the Atlas cluster.
Please note (security warning):
- In real-world usage, don’t use a global permissioned user like AtlasAdmin for accessing the collections after the schema and indexes are created. Create users with just enough permission to do their work. After creating the schema and indexes, you can use a normal role to access the collections (including the encrypted ones).
- In a real application, you would not inline your database credentials into the code as we’ll do below. In a real app, use an environment variable or config file.
Add shared crypt library
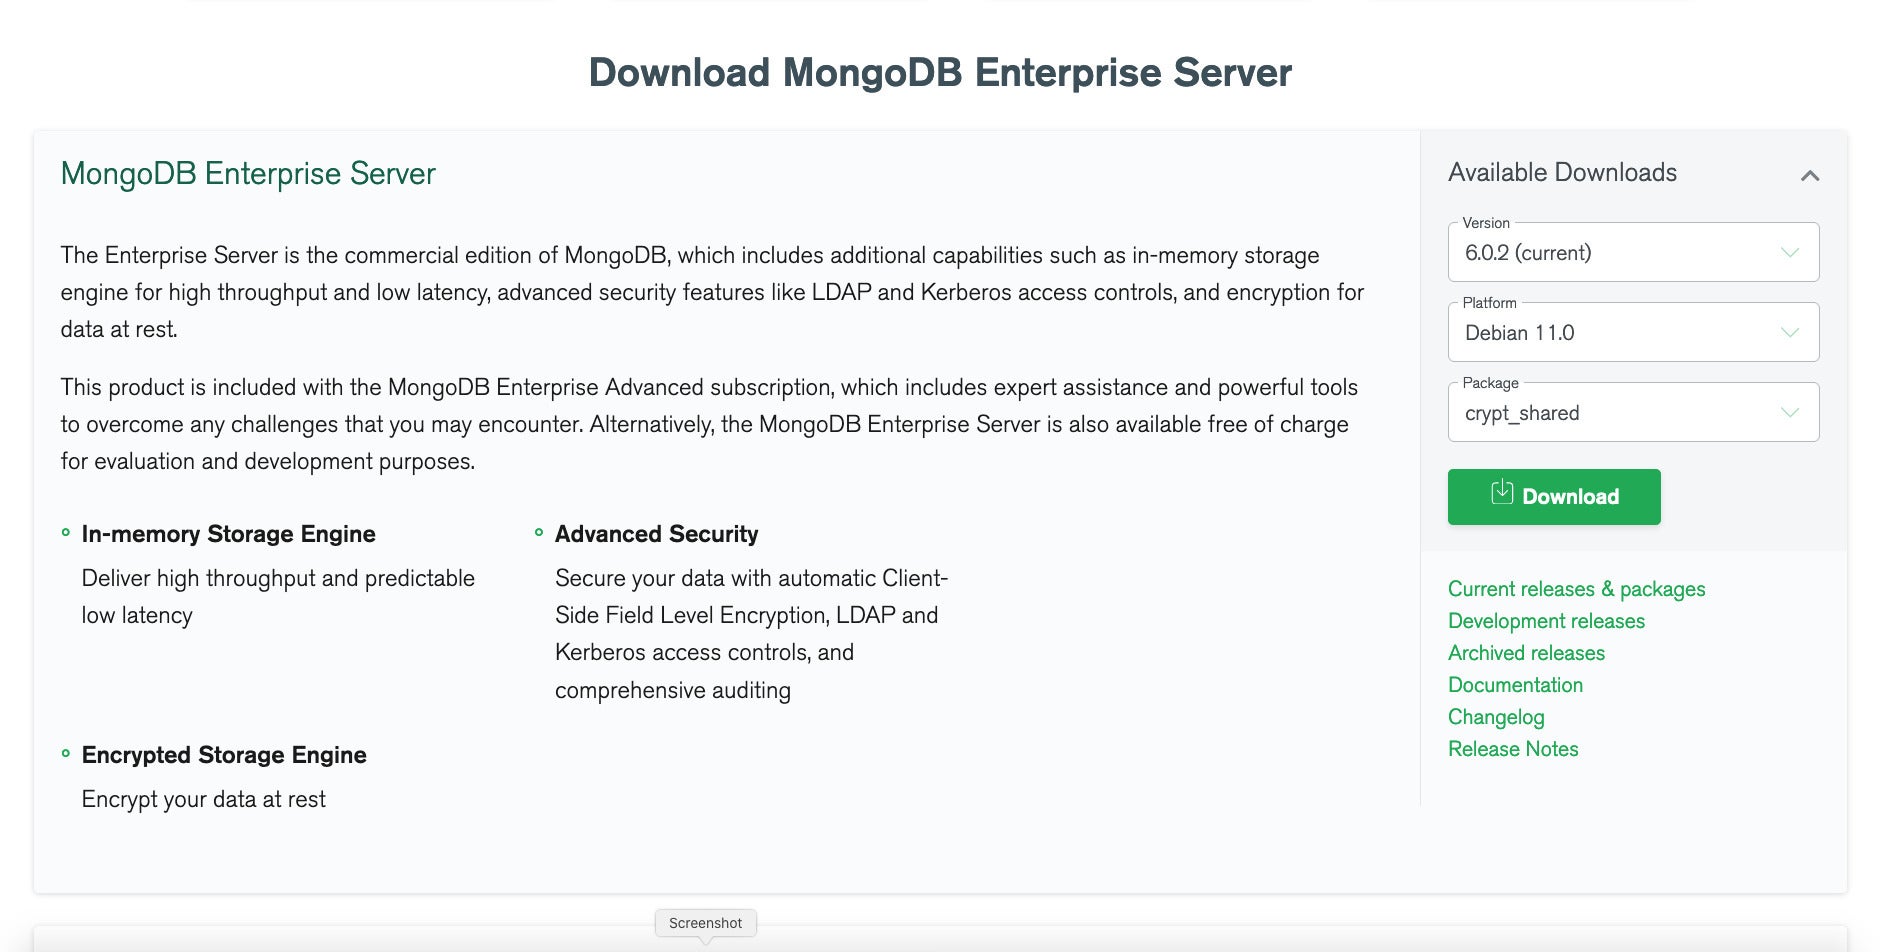
MongoDB supports two styles of queryable encryption: auto and manual. Auto is simpler, allowing the MongoDB client to negotiate encryption for you. To use auto, you need the shared encryption library from MongoDB available here. In the drop-down on the right, select crypt_shared, specify your operating system, and use the latest version, as in Screenshot 1. (You’ll also enter an email address to accept the license.)
Screenshot 1. Download the crypt_shared package
 IDG
IDGNow put that file in a convenient spot and unzip/untar it. In the directory created by extraction, you’ll find a /lib/mongo_crypt_v1.so file. That is the one we need. Note the path because you’ll need it later when we set the <MONGO_CRYPT_LIB_PATH> in Listing 4 and Listing 5.
The make-dek.js code
Now we’re ready to write the code for the make-dek.js file. This will be a small app that sets up the key vault collection and the encrypted collection itself. These two collections work in tandem to handle persisting, querying, and retrieving data from the encrypted collection. (This is covered in more depth at the MongoDB docs.) The contents of make-dek.js are shown in Listing 4.
Listing 4. make-dek.js
const { MongoClient, Binary } = require("mongodb");
const { ClientEncryption } = require("mongodb-client-encryption");const keyVaultNamespace = "encryption.__keyvault";
const secretDB = "secretDB";
const secretCollection = "secretCollection";
const uri = "mongodb+srv://<ATLAS_USERNAME>:<ATLAS_PASSWORD>@cluster0.444xyz.mongodb.net/?retryWrites=true&w=majority";
async function run() {
const keyVaultClient = new MongoClient(uri);
await keyVaultClient.connect();
const keyVaultDB = keyVaultClient.db("encryption");
await keyVaultDB.dropDatabase();
const keyVaultColl = keyVaultDB.collection("__keyvault");
await keyVaultColl.createIndex(
{ keyAltNames: 1 },
{ unique: true, partialFilterExpression: { keyAltNames: { $exists: true } } }
);
const localMasterKey = require("fs").readFileSync("./cmk.txt");
const kmsProviders = { local: { key: localMasterKey } };
const clientEnc = new ClientEncryption(keyVaultClient, {
keyVaultNamespace: keyVaultNamespace,
kmsProviders: kmsProviders
});
const dek = await clientEnc.createDataKey("local", { keyAltNames: ["dek"] });
const encryptedFieldsMap = {
["secretDB.secretCollection"]: {
fields: [
{
keyId: dek,
path: "secretField",
bsonType: "int",
queries: { queryType: "equality" },
}
]
}
};
const extraOptions = { cryptSharedLibPath: "<MONGO_CRYPT_LIB_PATH>" };
const encClient = new MongoClient(uri, {
autoEncryption: {
keyVaultNamespace,
kmsProviders,
extraOptions,
encryptedFieldsMap
}
});
await encClient.connect();
const newEncDB = encClient.db(secretDB);
await newEncDB.dropDatabase();
await newEncDB.createCollection(secretCollection);
await keyVaultClient.close();
await encClient.close();
console.log("Successfully created DEK and encrypted collection.");
}
run().catch(console.dir);
Listing 4 tells the tale of two collections: encryption.__keyvault and secretDB.secretCollection. These two collections are used together to support queryable encryption.
secretDB.secretCollection hotels the actual business data. The encryption.__keyvault collection holds the encrypted data encryption keys used on secretDB.secretCollection. There are two MongoClients in use. The encrypted client (encClient) is configured with the DEK created by the unencrypted keyVaultClient. The DEK is set on the encryptedFieldsMap.keyId field, which is used to configure encClient.
The encryptedFieldsMap holds further information for the encrypted client encClient, which is a standard MongoClient set with the autoEncrypted field populated. The encryptedFieldsMap tells the client which fields are encrypted (with the path property), in this case secretField. If the queries property is not set, the field will be encrypted but not queryable. As of this writing, only equality is supported as a queryType.
Notice that a ClientEncryption object (clientEnc) is used to generate the DEK. The clientEnc object uses the keyVaultClient along with the keyVaultNameSpace (encryption.__keyvault) and the kmsProvider.
The kmsProvider is a local key provider that points to the random number we generated at the command line. It is also used by the autoEncryption we set on the encClient client. (Reminder: Don’t use local kmsProvider in production.)
Inserting and querying data
Now we have the infrastructure in place to insert and query data in secretDB.secretCollection.secretField. This is done using the keys in encryption.__keyvault. Listing 5 presents a stripped down example of doing this with two fields, an unencrypted string on nonsecretField and an encrypted int on secretField.
Listing 5. Insert and query on encrypted and unencrypted fields
const { MongoClient, Binary } = require("mongodb");const localMasterKey = require("fs").readFileSync("./cmk.txt");
const kmsProviders = { local: { key: localMasterKey } };
const uri = "mongodb+srv://<ATLAS_USERNAME>:
<ATLAS_PASSWORD>@cluster0.444xyz.mongodb.net/?retryWrites=true&w=majority"
async function run() {
const unencryptedClient = new MongoClient(uri);
await unencryptedClient.connect();
const keyVaultClient = unencryptedClient.db("encryption").collection("__keyvault");
const dek = await keyVaultClient.findOne({ "keyAltNames": "dek" });
const encryptedFieldsMap = {
["secretDB.secretCollection"]: {
fields: [
{
keyId: dek._id,
path: "secretField",
bsonType: "int",
queries: { queryType: "equality" }
}
]
}
};
const extraOptions = { cryptSharedLibPath: "<MONGO_CRYPT_LIB_PATH>" };
const encryptedClient = new MongoClient(uri, {
autoEncryption: {
keyVaultNamespace: "encryption.__keyvault",
kmsProviders: kmsProviders,
extraOptions: extraOptions,
encryptedFieldsMap: encryptedFieldsMap
}
});
await encryptedClient.connect();
try {
const unencryptedColl = unencryptedClient.db("secretDB").collection("secretCollection");
const encryptedColl = encryptedClient.db("secretDB").collection("secretCollection");
await encryptedColl.insertOne({
secretField: 42,
nonsecretField: "What is the secret to life, the universe and everything?"
});
console.log(await unencryptedColl.findOne({ nonsecretField: /universe/ }));
console.log(await encryptedColl.findOne({ "secretField":42 })
);
} finally {
await unencryptedClient.close();
await encryptedClient.close();
}
}
run().catch(console.dir);
In Listing 5 we create two MongoDB clients, an unencrypted client and an encrypted client. With unencryptedClient we access the keyvault encryption.__keyvault that we created with make-dek.js in Listing 4, and we retrieve the DEK we stored there. We then use the DEK to build the encryptedFieldsMap, which also holds the path, type, and queries settings for the secret field.
Next we create the encrypted client, specifying the keyvault namespace (encryption.__keyvault), the kmsProvider (which is again the local file at cmk.txt), the extraOptions pointing to the shared crypt library we downloaded from MongoDB, and the encryptedFieldsMap.
Then we use encryptedClient to insert into the secretDB.secretCollection collection, with the secretField and nonsecretField set to an int and a string, respectively.
Finally, we query the data. First we use the unencrypted client — this time pointed at secretDB.secretCollection — to query using the nonsecretField and output the result. The result will show that the secretField is cipher text, while the nonsecretField is plaintext. The point here being that the unencrypted client can query and use the normal fields as usual.
The encrypted client is then used to query against the secretField, and when that result is output, all fields including secretField are visible. This demonstrates that encryptedClient has full access to all fields.
Note that secretDB.secretCollection also holds metadata in a __safeContent__ field. Be sure you don’t alter this or the key vault collection, or things may not work as expected.
Encryption you can query
MongoDB queryable encryption requires more development effort than unencrypted data, or even normal encrypted data, but it also enables a capability not achievable through any other means: querying data that is encrypted in isolation from its keys. This delivers a high level of security for sensitive data. For enterprises that require both maximum data security and queryability, MongoDB’s queryable encryption may be a must-have feature.
Copyright © 2022 IDG Communications, Inc.
[ad_2]
Source link
